The Giving Season: Love Your Melon

I am going to do a few gift giving ideas this holiday season, each with it’s own tie to helping kids in need. I started with American Girl and now up is Love Your Melon.

Love Your Melon is an amazing company started by Minnesota college students. Their mission is to put a hat on every child battling cancer. When you buy a hat, they donate a hat. It simple. Buy one, give one. These beanies and hats are super cute and affordable hats. They have a few different style of hats they sell. Some will keep your ears warm in the freezing cold winter, and others will provide shade from the sun on the hot summer days. The also have shirts and accessories on their site.

They come in a wide array of colors as well. These make perfect gifts for anyone on your list. They are super popular with college kids- I see them all over my campus. I have one and love it! I am planning on giving some as gifts to my cousins and friends this holiday season. Parents: They are a perfect gift for your nanny this holiday as well or your children! Nannies: they are a perfect gift for friends and family members! Who wouldn’t want to buy a cute, nice gift and help a sick child at the same time? Sounds perfect to me. Also ALL of their products are made in the US. Another added benefit to buying something from them. They keep it all within our borders and provide jobs for people in the US.

93b624c7ff01d553132b6e7894f94b87

A little more on Love Your Melon… Besides On delivery day local college kids who work for the company deliver hats to children in the hospital in superhero costumes! Which is such a great idea to brighten the lives of these sick children. They are a business run mainly by students on college campuses who want to make a difference, which I think is remarkable. It is so great to see college students working together, across the country to make a difference in the lives of sick children.

Brian_and_Zach_on_Superhero_Adventure_900

Check out their website here. Order yours today and make a difference in the lives of children!

xoxo Kelly

© The Nanny Guide 2015

Photos from: loveyourmelon.com and pinterist

Be Thankful

Being thankful is something every kid (and adult) can sometimes need a reminder of. I know I try my best to remember how lucky I am for the life I have but life gets crazy and hard sometimes, so I forget. Kids are busy bodies with a million thoughts going through their heads every second. It is easy for them to forget to be thankful as well. While it is good to be thankful year round, Thanksgiving is a good time of year to take a second out of our busy days and remember why/what we are thankful for. It is a good time of year to reflect on your year and life and remember all the things you are lucky to have. It is important to do this with your children as well! Here are a few simple way to break out the gratitude and thankfulness in your little one 🙂

6ba671763b11b62fe3d2948a068bef06

  • List off all the people who are a part of their life who love them. This is simple and can be done quickly. Ruby and I have done it a few times on longer car trips. I say who loves Ruby? and she starts listing off mommy, daddy, Kelly, grandma, grandpa, etc. After we have listed off a lot I make a point to tell her how lucky she is to have so many people who love her and who she loves. Then I remind her that she should be thankful to have so many people on that list. It always boosts her mood and puts a smile on her face. I then follow that up with “next time you see _____ you should tell them how much you love them.”
  • Make a craft relating to Thanksgiving and being thankful . There are so many options with this, and it is a great way to teach kids the wide range of things they have to be thankful for. It is easy for kids to list off concrete examples like my blankie or my train track, but it’s harder to list of the more abstract ideas like family, friends, education, etc. While doing the craft you can teach them about the more abstract ideas. After they name their first few then you could say something like “well aren’t you thankful for having a nice friend like Abby?” A question like that will prompt their little minds to start thinking of things along that realm. Keep that discussion going! Here is a great list of 7 crafts that can teach kids about being thankful!
  • Remind them how lucky they are to be healthy and have full bellies. A lot of kids don’t know on their own that these are things some people don’t have. It is am important life realization to have because it is part of our reality. You want to be age appropriate in how you describe that there are kids who are sick and in the hospital or that there are kids who don’t always get to eat dinner. If you make things seem too bleak it may not register with them, but they are smarter than you think and can handle a version of the truth about health, food, and wealth. I leave that discretion to you, the nanny or parent. You know your child the best and how you think this discussion should go.
  • Donate food to a local food shelf. Tell your kids that since not everyone can buy all the food they want (or need) you guys are going to help them out! Bring your kids with and ask them what they want to buy. I have done this with Ruby and she usually gives some of her favorite foods. It a good learning moment because it causes her to reflect on what she likes and that well maybe another kid would like some Easy Mac as well! It teaches compassion and social awareness. Have them help you bring the food in to the donation site. Afterward celebrate their charity work with a fun snack or trip to the park. Let them know how proud you are of them, and that they just helped make a lot of people happier.
  • If your kids are old enough- volunteer! I have gone with school groups and my parents since I was young to Feed My Starving Children. At FMSC you pack meals for people in countries all over the world in dire need of food. They present the need for food in age appropriate ways, so you don’t need to be worried about it scaring you child. I have very fond memories of going there as a kid! It’s usually an upbeat environment with lots of laughter and good feelings. If there isn’t a FMSC near you, look for other local places that pack meals for the hungry. They are all over!

A few things I am thankful for this holiday 🙂

  • All my tiny humans!
  • My sweet, loving boyfriend
  • My amazing family
  • My education
  • The ability to travel
  • My best friend (even though she lives 1,000 miles away!)
  • The little opportunities each day brings to make a positive difference in people’s lives.

Being thankful for things we have isn’t something that is something that we explicitly say everyday, but hopefully there is a moment each day where you think about it. This is an important thing to instill in your kids. Learning to be thankful teaches kids humility, the importance of giving to others if you can, empathy, love, and a bounty of more skills. It will help them develop into compassionate, helpful, grateful humans.

On that note, I hope you all have a safe, fun-filled Thanksgiving! I leave you all with one of my favorite quotes that isn’t directly related to being thankful, but something I have learned as a result of being thankful.

Inspirational-Quotes-Do-what-you-can-with-what-you-have-where-you-are-Theodore-Roosevelt-1


Toddler Fashion on a Budget

Move over Crewcuts and  Jack and Janie, there is no need for you in today’s toddler fashion world! Thanks to stores like Target and Old Navy I can find just as fashion forward and adorable clothes that you sell for more than half the cost! My little toddler fashionista Ruby loves clothes, especially dresses! Everyday getting dressed is her favorite time. Usually we end up getting dressed 3 or 4 different times in new outfits 🙂 While usually a child with a love for fashionable clothes comes at a hefty cost, we have found ways to avoid that cost! All of her clothes come from Target, Old Navy, The Children’s Place, Khol’s, Gap, and TJMAXX. She gets compliments everyday on how cute her outfits are and people ask where we get her clothes. Every time I respond with Old Navy or Target people are usually surprised. Attention everyone: Target and Old Navy have the cutest clothes for little ones and at an affordable price point!!

Sweater Dress: Target $19 Leggings: Old Navy $4 Boots: Old Navy $15

One of the cost struggles of having a child is the amount of money spent on clothes for them, because they are constantly growing. If you don’t have a sibling or family member close in age, hand-me-downs are out of the question. Then comes the struggle every season to make sure their clothes fit and if not get new ones. Instead of dreading going shopping for your kiddo because you think cheap clothes equate with ugly and low quality, think again. The majority of Ruby’s closet consists of clothes from the stores listed above. Every piece lasts through the whole season and we always find fashion forward pieces.

IMG_1191

Vest: Target $15 Jeggings: Target $7 Tunic: Target $15 Boots: Target $13

We rarely ever buy anything when it is full price. Every store below always has a sale. These are our shopping tips for each store listed below.

Our favorite stores:

Target: Use cartwheel! They usually feature brands, such as Cherokee or Carter, each week for a certain percentage off. Buy your clothes then. Stock up. It may feel like you are spending so much one time, but in the long run you will be saving money. Also take advantage of their text message sales. The day we got the vest, tunic, leggings, and boots, they were having a sale where if you texted a number you would get a coupon for $10 off every $25 spent. That will save you so much! Especially when buying winter clothes, because those are always more expensive. The main point here is stock up when these sales are on because in the end you will spend less money overall. As always check the sale racks too. You can usually find some good stuff there as well.

IMG_0080

Shirt: Old Navy $12 Shorts: Target $5 Sandals: Target: $15

Old Navy: They always have on trend clothes there! If you are looking for nice dresses and coats, or basics like leggings you can always find those here. You can usually always find these items on sale as well. Recently all toddler and infant clothes have been 40% off. Ruby went on a shopping spree last week because she had grown out of all her 2T winter clothes
IMG_2125 
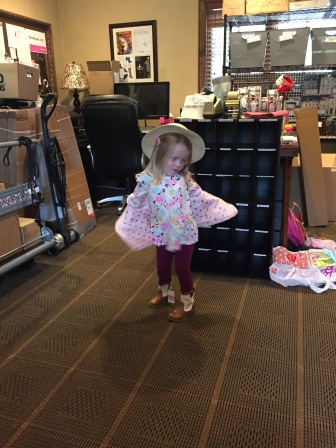
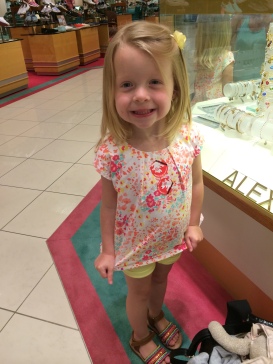
and we needed some new ones. Getting 40% off sweaters, long sleeve dresses, shoes, and pants is AMAZING! She got multiple pairs of leggings for $4 each. Shirts, like this cute one in the picture, for $5, and the pink sparkle leggings for $4 as well. Her pink boots in the pictures on the top were $25 originally, but we bought them on sale and saved a bunch! Once again my main point here is stock up when the sales are on. We did the same thing this summer when buying new shorts and dresses. The savings add up over time.

The Children’s Place: Once again with this store always buy when on sale! We usually end up at the mall once a week (going to the play place there) and each time we’ve walked by in the last few weeks, they have been promoting 40% your entire purchase. These savings were on top of other sales going on in the store. All fleece jackets were on sale for $20 and then you got 40% on top of that, so the cheetah print, cozy jacket we got Ruby was only $12. Once again stock up and take advantages of these sales. We got her a Christmas tutu dress, leggings, jacket, and headband for $30.

Kohl’s: This store as well always had tons on sale. You have to be willing to dig through all of the clothes on the rack, but you can usually find some  good stuff. We got a lot of cute summer stuff back in the springtime when it was on sale.

Gap: I was hesitant to put this one on the list at first. Their clothing is more expensive, in general, than clothes from the other shops. I worked at Gap for a few months and what I realized is that something is always on sale in that store. One week it may be pants, the next t-shirts, and the next dresses. My tip for this store is only buy clothes from there if it is on sale. There is no need to spend $30 on a dress when it could be on sale the next week, or you can find one just as cute, for less, at another store. The one things I can attribute to clothes from Gap is that they can be higher quality fabric and materials then other stores.

All in all buying clothes for your toddler should not be something to be dreaded anymore. There are so many inexpensive places to buy cute clothes these days. Make sure to be vigilant of sales and stock up when you find a good one.

Creative Play: The Making of Princess Street

Hello Nannies and Parents! I will warn you that this post is a long one but it features 2 how to art projects, play tips, and storage tips! Also with the upcoming holiday aka CHRISTMAS this could make for a great gift for your little Lego/ block lover this year 🙂

The idea for Princess Street began one day during nap time as I was staring at the hap hazardous mess of Disney Princess Legos and Duplos strewn all across the living room floor. Ruby had fallen in love with Legos after a trip to Barnes and Noble. She got hooked on the Disney Princess sets. So she earned each one as rewards for helping around the house or doing something special. As we acquired more and more of these adorable sets I realized we had no real, good place to play with them. When we played on the carpet it was too hard to put them together. When we played on the hardwood floors they slipped all around. So I was left with a challenge to figure out the perfect place to play with these great Lego sets. I looked at Target for the green Lego squares that can hold Legos down, but those were $20 for one! So then I started thinking about how to solve this problem. Lego Friends has a play mat for the Heartlake city where all the girls are from. You can put the Juice Shop along one street and Emma’s House on the next. I then figured out something like that would solve this problem. However I searched all over the internet and nothing like this exists for Disney Princesses. There is no play mat or anything that can make a princess neighborhood. This baffled me because as Ruby always say “but Kelly I don’t want to play with just one. All my princesses are best friends and want to live by each other.” It was then I knew I needed to make my own Disney Princess neighborhood. So I took to brainstorming how this might be possible. After work that day I went to Michael’s craft store and walked around and around and finally figured out exactly what I was going to do. It took time and love but the finished product was totally worth it. Take a look inside Princess Street 🙂

As you can see Princess Street has evolved as Ruby has grown. It began with the Disney Princess Lego Duplo sets, and now holds the Disney Princess Lego sets and a house we created on our own from Target. That is the beauty of Princess Street, it can become anything you want it to. We reorganize it and design it each time we take it out. We have also come up with a neat and organized way to store it all. Below are the instructions on how to make and store your own Princess Street (or Lego City, Superhero Lane, or any other neighborhood your kiddo wants!):

What you will need: 

  • 2 Foam Poster Boards (found at Target, Michael’s, Walgreens, etc)
  • 3D Puff Paint (various colors that pertain to your theme, found at any craft store)
  • Curved Road Stencil (I made mine out of thick cardstock)
  • Duct Tape (color doesn’t matter because you can’t see it)
  • Stickers (pertaining to your theme, ours is princess of course!)

How to make:

  1. Lay the 2 boards on the floor side by side.
  2. Draw your stencil however you want your road to be. I wanted ours to curve so I drew it that way. Cut your stencil out of your thick paper.
    IMG_2160
  3. Place your stencil where you want the road to be. Hold in place and trace around. Do the same on the other board.
  4. Use marker or puff paint to outline the road and make marks along the lanes.
  5. Use puff paint to write the name of the neighborhood. We chose Princess Street.
  6. Let dry COMPLETELY. Usually 2 hours will do. Keep child away! As you can see on the back of mine I messed up and didn’t wait long enough 🙂
  7. Add details to the neighborhood, like a pond or garden with makers. We chose to have 2 ponds because in the beginning we had 2 Ariel Lego sets and of course both needed to be in the water!
  8. Decorate with stickers where you want.
  9. Once the front is done and dry, flip them over and place duct tape along the edges connecting the two boards. Put a good amount on. This will help reinforce the middle of the boards. Only put the tape on one side though, otherwise it own’t be able to fold up for easy storage.
  10. Set up your Lego sets how you would like and enjoy!

The Disney Princess Lego sets we have featured on our Princess Street are Sleeping Beauty’s Royal Bedroom, Jasmine’s Exotic Palace, Ariel’s Magical Kiss, Cinderella’s Romantic Castle, Cinderella’s Dream Carriage, and Rapunzel’s Creativity Tower. We also have the Lego Duplo Disney Princess Collection featuring Snow White, Cinderella, and Ariel.

All and more can be found HERE!

How to Make Your Own House:

As you can see we added a non Lego house to our street. I’m sure you all know Lego sets are expensive! Ruby loves Princess Street so much and wanted more and more to fill up the neighborhood, so instead of buying another expensive Lego set we ventured to Target to buy a make you own kit! Kid Made Modern Art-Chitecture Kit

This kit is only $25 and is very sturdy. Now this set is not too kid friendly for them to make. It’s kinda difficult even for adults. Totally worth it in the end though, but it took some time. To include Ruby in the making of this house I had her pick the paper I used on the walls and floors.

What you will need:

  • Kid Made Modern Art-Chitecture Kit (from Target)
  • Extra scrapbooking paper (any craft store)
  • Scissors
  • Markers
  • Glue Stick

How to make it:

  1. Follow the directions inside the kit.
    IMG_0692
  2. It comes with a lot of furniture pieces but those are really hard to put together. We only put together the ones we knew we would use (bed, table, chair, etc).
  3. Decide what papers you want to be on what walls and floors. It comes with about 10 pages that stick right on to the wood. That is not enough to cover every wall and floor. We used scrapbooking paper to finish off the other walls.
  4. Trace the size of the wall and cut the paper to fit. Then use a glue stick to get it on the wall and floor.
  5. Once you have all the walls and floors covered in your desired paper you can glue it all together!
  6. Let it sit and dry for a day before use, but then it is good to go.

We put ours up on TV trays that Ruby has at her house. It allows her to be able to walk around the whole street. She can play with the fronts of the sets and the backs. She loves driving her princesses from house to house in her Cinderella carriage, or has special guest (Lego Friends characters) fly in on the private jet. You could also set this up on a coffee table or even just the floor!

It’s easy to set up and easy to store. The boards fold together so it can fit in a small space along a wall. We bought storage bins from target to put Ruby’s blocks in. We have one for her Lego Duplo blocks. We have a few for her Disney Princess Lego’s so we don’t have to take apart all the Princess’s house each time we play. Then we have a small 3 storage drawer labeled with easy to read titles of things to keep in them (dolls, extra parts, sticks, etc).

Princess Street has been a HUGE hit at our house! Every kid who comes over always wants to play with it, and Ruby loves to let them. While yes it does take some time to get it all put together, like I said before totally worth it. I would make a million more of these because they provide so much fun for your kid! It allow them to be creative and inventive every time we pull it out to play. I hope you found this how to helpful and enjoy your version of Princess Street as much as we love ours 🙂

xoxo Kelly

© The Nanny Guide 2015

More Pictures from Princess Street

The Giving Season: American Girl Dolls

110615_retail924-245584

While there are many places in need and worth donating to this year, I want to highlight one unique option that means a lot to me. I still remember getting my first American Girl Doll for Christmas when I was 10 years old. I treated Kailey like she was my daughter. I loved that doll. I played with her every single day. I knew how special she was and lucky I was to be able to have one. Now one of the little girls I nanny loves that doll still. American Girl dolls are amazing friends and playmates for any child. They are even better playmates for kids in need. They can provide them with some joy and happiness in a not so happy place. This year American Girl is partnering with the Children’s Hospital Association and donating American Girl dolls to sick children in their hospitals. For every doll someone buys, American Girl is donating a second doll to the Children’s Hospital Association. If you are thinking about getting your child, grandchild, niece, or anyone an American Girl Doll for Christmas, buy it now! This “Get a friend. Give a friend.” promotion is only going on until November 30th. What a special way to make a donation this year. I know they are expensive dolls; however this may take the bite out of spending $130 on a doll, because with that you are making another little girl’s holiday wishes come true. Thanks for being awesome American Girl!

If you want to donate a friend to a someone in need head over to their website.


Photo credit: https://www.americangirl.com/general/giveafriend

The Importance of Reading with Kids

Lazy days (like Sundays 😊) are the perfect days to cuddle up with your cutie pie and read books on books on books! There are so many benefits to reading with and to your little one. Books inspire kids to imagine and dream about things and places you’re reading about. The simple act of reading a book aloud to your child helps them develop in multiple way. It develops their memory skills, especially if at the end you ask them what their favorite part was. In relation to memory, it helps kids work on their attention and patience by having to sit still, for a prolonged period of time, and attend to the words and pictures. Lastly it helps in language development. When reading books kids are exposed to so many words and pronunciations. There are a million more benefits to reading, these are just a few. Given all these benefits make reading a part of your daily life with your kid! It’s easy and it’s fun. This goes for kids of all ages! It doesn’t matter if they are 1 or 12 or 50, reading is always beneficial.

quote1

Ruby (the little girl I nanny) is 3 so she can’t read any words yet, but still loves when I read aloud to her. This is how me and Ruby have made it apart of our daily life. Every day when Ruby wakes up her nap, we lay in her bed and read 3 or 4 books. She can be a little grumpy and still sleepy when she wakes up, so this is my way of getting her past the “I’m still waking up phase” to the playful Ruby phase. She usually passively takes in the first couple books, but by the 4th book she is super engaged, asking questions, and talking about the pictures. She loves it.

Below are some books we recommend, places we recommend getting them at, and a fun art project! 

Some of our favorite books that we recommend you checking out are:

For the older audience (3 and older): 

Ellie by Mike Wu, a heartwarming story about how everyone is talented in their own unique way. Told with beautiful illustrations and adorable animals!

ellieCover

Pinkalicious by Victoria & Elizabeth Kann, a sweet story about a girl who loves pink and being herself no matter what. Perfect for any pink loving little kiddo. (we also suggest Aqualicious and Purplelicious)

The Berenstain Bears by Stan and Jan Berenstain, a personal favorite of mine from when I was a kid! With a wide range of stories about everything from becoming a big sister/brother to telling the truth to eating too much junk food, your kids will always come away from these books learning a good lesson.

For the younger audience (3 and under): 

Duck and Goose by Tad Hills, this is a series with multiple books covering many learning domains such as counting, empathy, holidays, colors, emotions, opposites, and many more. Each one is short and simple, but filled with tons of things for kids to learn. Plus they are the cutest little guys!

The Wonderful Things You Will Be by Emily Winfield 51q3+u5cenL._SX473_BO1,204,203,200_
Martin, a eloquently written, beautiful book telling the story of something all parents will find meaningful. Every parent (and nanny 😊) wonders about their tiny humans will become one day.

Giraffes Can’t Dance by Giles Andreae, a quirky, cute story about a giraffe who wants to dance even though he isn’t exactly made to. It shows kids you can do whatever you put your mind to.

IMG_7628You can find all these books and more amazing ones at the LIBRARY! Ruby and I love the library. Our local libraries have fun places to cozy up and read, blocks to play with, and toys to imagine with. It is always a fun morning when we head to one of them. After Ruby got her first library card this summer we decided to make a special library book bag to store and carry all her library books in! Such a fun, easy, practical art project. Directions are below!

What you need: 

1 canvas bag (we found ours at Michael’s craft store for $3)

3D Fabric Paint in favorite colors (found at Michael’s)

Pencil

How to do: 

  1. Place some cardboard inside the bag to prevent the paint from going through to the other side.
  2. Use a pencil to sketch out your design. Draw lightly incase you want to erase and start again 🙂
  3. Gently squeeze the 3D fabric paint over the pencil lines.
  4. Let dry for at least 3 hours!! This is the hardest step for kids to obey. We did ours before nap time so there was no temptation.
  5. Use and enjoy your new personalized book bag! We take ours with overtime we go.

Since Ruby was a little to young to use the paint I had her color on the other side of the bag with fabric markers. This made her feel like she did some too. She also helped pick out the colors and decided which words were what color. If your child is old enough to use the fabric paint let them create their own unique design!

If you like to buy your books to keep them around enroll in IMG_7615Barnes and Noble’s Kids Club! It keeps track of how many books you buy and allows you to enjoy special perks! For every $100 you spend on kids book you get a rewards certificate to redeem in store. They have other fun promotions you can take part in. The store itself is always a fun place for kids to visit too. They have a Lego Duplo area to build for free and a fun storytelling area.

I hope this post encourages you to make reading an important part of you and your kiddos life! I leave you with this quote by a familiar friend

more-i-read-the-more-you-know-1

How to have the best nanny/boss relationship possible!

Hi all happy Wednesday! This post is going to go a little differently than my other ones. It is designed to help BOTH nannies and parents/bosses figure out a way to have a good, healthy relationship. So please share this with any nannies you know or parents you know that have nannies!

I’ve seen a lot of posts on nanny forums recently about nannies having bad relationships with their bosses, nannies feeling used, or nannies feeling that their time is not valued. Given that I thought it might be a good time to send out some advice on how to prevent or make those things better. The key is COMMUNICATION. That is the basis for every good, healthy relationship and especially a relationship between a nanny and parent.

I have always been very communicative with my bosses. I think it helps make the job easier for me, and it helps reassure the parents that I know what I am doing and am confident. After reflecting on what I think has been the most helpful aspects of communication in my relationships with my bosses I came up with this list to share with you all! Nannies, I hope some of these ideas help you, or encourage you to have this conversation about good communication with your boss. Also, parents/bosses remember that healthy communication between a boss and their nanny is a two way street. Make sure you are open to communication and feedback from your nanny. Now let’s get at the little details!

Honesty is key from the get go. No relationship between a nanny and parent will work without honesty from both parties.

  • Nannies: Start being honest from your first meeting. Be honest about what you are willing and not willing to do as a nanny. If you feel strongly against doing maid type work, tell you boss that from day one. I know it may be a deal breaker for a job, but if you lie and say you are okay with doing the laundry and dishes, when you aren’t, down the line this could cause problems. Be honest about your schedule and flexibility. If you need to be done everyday at exactly what time the parents say they will be home, tell them that. Explain to them that you have to get your kids from school at 5:30 so you need to leave at 5, or that you have night class at 7, so you need to leave in time for that everyday. They should respect those commitments. Also be honest with them when it has been a crappy day at work. It may not feel good to tell them how rude or disrespectful their child was to you that day, but they should, and probably, want to hear that so they can talk to their child about that. I had a difficult child one summer and I had to tell the mom I couldn’t work for them any longer if he continued to treat me the way he did. It was one of the hardest thing I’ve ever had to do, but that honesty with her prompted her to have a discussion with her child about respect. It ended up not working out in the end, but what I learned from that is even when it’s hard to be honest with the parents that is when you really need to be.
  • Parents: Start by being honest from your first discussion with the potential nanny. I know you may need someone right away so the tendency is to make you sound as likable as ever, but make sure everything is honest. If you know you need a nanny who is flexible because your job is demanding then say that. Do not mislead your potential nanny, because that will cause issues down the line. When it comes to your interview ask them everything you want that you think will help you make your decision. Also answer all of your potential nanny’s questions honestly. If she asks you if she will be expected to clean up the house, answer with exactly what you want her to do and see what she says. Make sure you tell your potential nanny everything you are going to expect of them from the start, and if you see yourself adding expectations in after you see how everything goes.

Contracts may help facilitate a way of communication. 

  • This is an especially important thing for full time nanny positions. I am not an expert on nanny contracts and am not going to act like I am one 🙂 This is a good article to take a look at when preparing your contract. It gives 20 helpful ideas of what the contract should cover. The one thing I do know though is to physically print the contract out and keep it with you. The nanny and the parent should both have a physical copy to able to refer to. And DO refer to it. If part of your contract is being broken by either party, bring that up to them along with showing them the contract again. This may seem super formal, but it is an effective way for both parties to feel protected and in control.

Have an open dialogue. 

  • Make sure you both feel comfortable talking to the other if things come up. Life is messy. Things happen out of our control, and that is okay. Nannies, if you need to take some time off because of personal reasons be upfront with your boss. Explain as much as you feel you need to them, and also be open to there response. Compromise is key here. If you are requesting something outside of the realm of the contract you have to be willing to compromise. The same goes for parent/bosses, compromising sometimes is necessary. If you need to cut their hours for a few weeks for whatever reason, tell them right away. Hear what they think about that and go from there.

Some small things that may help make communication easier for all… 

  • Monthly Meetings 
    • These can be to asses how things are going for both parties. Nannies you can say what is working well and what isn’t, and parents you can do the same.
    • As you get more comfortable with each other and gain more of routine maybe make them bimonthly or every 6 months.
  • Don’t Let Little Annoyances Pile Up
    • This is true for both nannies and parents. If something is bothering you about some aspect tell the other person before it becomes something bigger than it needs to.
  • Nanny Notes!
    • I know there are a lot of templates for these out there but I created a new one for all of you. I tried to make it user friendly and printer ink friendly (ink can add up in cost big time!)
    • Nannies try filling these out each day to keep the parent informed. I have found that parents love them.
    • Parents offer to print them out for the nanny (help them save money) and then you can stay in the loop.
    • Nanny note link!

My last piece of advice: If all else fails and there is no way to achieve good communication with your nanny or your boss, quit. It sounds harsh, but don’t stay in an environment that isn’t good for you. It will only get worse for you and they family you are with.

xoxo Kelly

© The Nanny Guide, 2015

A Little Nanny Appreciation

Screen Shot 2015-11-08 at 7.16.26 PM

I saw this post last week on The Nanny Box’s Instagram and I knew I had to share with all of you!

“When nannies feel appreciated, they work with tons of joy and confidence!”

A simple yet often overlooked statement to start the week off right. I have been extremely lucky to work with amazing families who have made me feel appreciated everyday when I show up to work. It makes me want to come to work everyday. I had one family and the appreciation wasn’t as evident. It didn’t make me do my job any worse, but it did mentally break me down a little. I had a tough nanny child at that time, and I was doing my best to try and teach him right from wrong. Sometimes all you need is a thank you. It doesn’t have to be in the form of a raise or a present (both are nice every so often though 🙂 ). It can be a simple “we are so lucky to have you,” or “I love the way you care for our child,” or just a “you’re awesome and we love having you as our nanny.” I have been told all of those things and I can tell you it does make a difference in how you do your job. This can come from the child as well. It effects you in a conscious and subconscious way. When you are positively reinforced by you boss or nanny kiddo you do feel more confident at what you are doing, and it does make you more joyful!

So, parents, remember to tell your nanny how much you appreciate all they are doing. It will go a long way and lead to a happy work environment. Also remind your children every so often how lucky they are to have a nanny as great as the one they do. Then your child may be more likely to thank the nanny. Like I said above it can be easy and simple. Simple is still meaningful. However if you really want to show some nanny love it can also be something like having a nanny appreciation day! Have you and your child write them a card about how much they mean to you, get them flowers or a candle, a framed picture of them and your child, and a special treat. Then have that on the table one morning when your nanny shows up for work. Once again, I can tell you from personal experience how wonderful it is to know you value them.

And nannies remember to be be confident and joyful in all that you do with your nanny children. Even if you are not told every day, deep down I think you do know how appreciated you are, and will always be, by the child you are with. Also know I appreciate you and everything you do! So go off to work this week and kill it with some extra confidence and joy 🙂

xoxo Kelly

© The Nanny Guide 2015

7 Useful Childcare Tips for Parents and Nannies!

Hi Nannies and Parents! Happy Thursday to you all!

Today I thought I’d share some of the childcare tips I’ve found to be useful and effective with all of my kiddos I’ve watched over the years. Over my 10 years of working with children I like to think I have seen it all. Granted I also know from those years that when it comes to kids you can never know it all 🙂 Everyday they do something new. Somedays it’s funny things, somedays it’s amazing new things, and somedays it’s really tough things to deal with! Every day spent with a child is a learning opportunity for you as the nanny or parent. You can learn a little more about what works and what doesn’t in your nanny/child or parent/child relationship. All of my relationships with my kiddos vary because each kid is unique and special and perfect in their own way. However I have found some pretty universal tips that work well with all of them! So here we go…

  1. Get down on the floor and play with them. Be as active with your child as you can. If they are having a spontaneous dance party, dance with them. If they are building blocks in the family room, get down and build along with them. As well as showing them you are interested in what they are doing, it can also teach them sharing and interactive play. Engage with them. Ask them questions. Join in the imaginative play. This is a great time to bond with your child as well. Ruby and I quite often have princess parties with her dolls.
  2. Talk to your child at their eye level. Get down on their level or bring them up to your eye level. This is especially important when talking about something they did that wasn’t okay. They feel less threatened or intimidated if you are calmly talking to them face-to-face versus raising you voice and standing up tall over them. They also tend to retain their information you are telling to them better because there is less distraction between the communication.
  3. Praise your child’s good behavior. Don’t just point out the bad. While it is important to correct your child when they do something wrong or inappropriate, it is even more important to point out and tell them what they are doing well. This can also be known as positive reinforcement. You are reinforcing your child’s good behavior. Simply saying “wow thank you for putting away your toys Sam,” will encourage your kid to keep doing that behavior. Other small things to praise and encourage are listening to you the first time you tell them to do something, clearing their dishes, using good manners, and being well behaved in public places.
  4. Choose your words you use in front of them wisely. If they are not allowed to say shut up, don’t say it in front of them to another person either. Children are little sponges they absorb everything you say, and I mean everything. If they hear you using certain phrases they will most likely imitate you because they don’t know any better. So be careful and keep your conversations as age appropriate as possible when they are in hearing distance. Other good words I found to avoid are hate, stupid, any swear word, and other words with strong negative connotations.
  5. Read to them. Reading aloud to your child helps develop language skills. Language development is crucial in a child’s development. The easiest and most fun way to expose them to language is through reading books with them. Read aloud to them at least once a day. Make going to the library to pick out books a fun adventure. Usually libraries these days have toys, blocks, comfy chairs, and other fun things to do while there, so you can make a morning of it. Also Barnes and Noble has a great kids program that rewards you with perks after you buy a certain amount of kids books. Ruby loves going to Barnes and Noble because they have blocks there. We always play with the blocks for a little while and then go to the books. Being able to play with the blocks motivates her to go to the bookstore. However once we get there she sees all the book’s, and sometimes she even ignores the blocks all together because she wants to read all the fun books.
  6. Build in an extra 10-15 before leaving the house. I have found this to be my number one stress reducing trick. Something always comes up when little ones are involved, whether it be needing to go potty, spilling juice, or forgetting blanky. All of those little accidents or moments can add up and make you feel stressed to push faster to get out the door. I’ve learned if I start preparing to leave to go to dance class (or the library, soccer practice, dinner, etc) 10 minutes before I think I need to, I usually end up getting out the door right when I need to. If you end up having no mishaps and get out the door super fast, getting somewhere with 10 minutes to spare never hurt anybody! When you are stressed your child can tell, and that usually stresses them out as well. Keep your cool and give yourself some extra time when possible.
  7. Give effective timeouts. Sometimes kids don’t always understand why what they did was wrong, especially if it is the first time they’ve done said thing. Explain to them what they’ve done wrong, why it is wrong, and why they need to have a time out. Make sure they get it before leaving them in their timeout. What seems clear to you may not be clear to them. Also make sure you are only leaving them there for a reasonable amount of time. 10 minutes to a toddler feels like an hour. 2-3 minute time outs for toddlers is enough. As they get older the time can/should increase to a degree, especially when they can understand the severity of their actions.

I hope you found some, if not all, of these tips helpful! Like I said above they are general universals I have found. I’ve had experiences with kids who range from needing strict guidelines and rules to kids who are okay with only a few. All these tips are all adaptable as well 🙂 Tailor which ever ones you like to your own family. Every family is different, but I’ve found these one’s tend to work with all kiddos!

xoxo Kelly

A DIY Party

Welcome to Pixie Hollow!

For Halloween the family I nanny for and I transformed their frot entrance into Pixie Hollow, from the popular Disney Fairies franchise. While we did this for Halloween, this could easily be replicated for a birthday party as well. It could also be done with almost any theme. Whether that be Disney Princesses, Batman, Frozen, baseball or anything else you can come up with. It took some planning and effort in the weeks leading up to Halloween. It took a lot of work, time, and creativity in the 2 days prior, but overall it was pretty easy to do for not very much money. The key is DIY. Mainly everything we did, we did or made ourselves. It’s all about being as creative and resourceful as you can with what you have. Here’s a look at how we took their regular front entrance and made it a magical fairy forest!

IMG_1893  Before & After  IMG_1894

  1. Choose the theme. A couple months ago Ruby decided that she wanted to be Fawn, the animal fairy, from the Disney Fairy movies for Halloween. Ruby’s mom is super creative and loves getting into the theme along with Ruby, so she decided to be Tinkerbell, who I’m sure everyone recognizes from Peter Pan. I (along with the help of Ruby) decided to be Silvermist, the water fairy. Part of how the mom and I chose which fairies to be was based on hair color so that way we could save money from having to get a wig, but also look the part naturally. Disney’s fairies was our theme and we were going to do it right.11_DSN_44632_DsnyFairies
  2. Choose your main setting. For us that was Pixie Hollow because that’s where the fairies spend most of their time. Other settings for other themes could be the Batcave for Batman or Cinderella’s Castle for a princes party. For any nanny or parent out there that does not know what Pixie Hollow here’s a few details. Pixie Hollow is fictitious place in Neverland where Tinkerbell and her fairy friends live. They have little animal friends, tinker friends, and live in the nature surrounding them. We decided the easiest way to bring Pixie Hollow to life was to make their front entrance it. If you were doing this for a birthday party you could turn your living room into Pixie Hollow and go from there.
  3. Decide how to execute the scene. Ruby’s IMG_1885
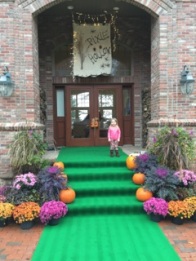
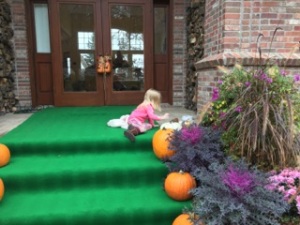
mom and I spent a morning going over ideas of what we thought would make Pixie Hollow real for us. It was hit or miss, some ideas we loved and some we realized were not feasible. To create the forest we knew we needed pumpkins, acorns,branches, and green grass.  We got the glitter pumpkins at Micheal’s on sale for 40% off. The green turf came from Menard’s and we cut it to fit the walkway and stairs. The real pumpkins could come from anywhere, even Target and just grab some branches from your yard. The sign above, that says “Pixie Hollow,” is just canvas paper attached to a large stick to IMG_1888hang from. Ruby and her mom spent an hour or so painting and hot glueing all the elements on to the sign. If your kiddo wants to help with something always let them. Being helpful is such a good skill to instill in them. Obviously don’t let them operate the hot glue gun, but let them paint a little on the canvas. It won’t hurt anybody 🙂
  4. Costumes. Since Ruby would get the most use out of her costume her mom went authentic and ordered it from Disney. It was amazing! Perfect in every detail and fit Ruby great. She did some research for her Tinkerbell costume anIMG_1874d fo
    nd one online that fit her budget and her idea of what she wanted. Researching and looking at plenty of reviews can help find the best costume for the right price. Ruby’s dad even got into the theme and they found a Captain Hook costume for him online. My costume was a little harder to find so we got creative. Ruby’s mom found a blue dress online for cheap, and then we were added our own embellishments. We got it and there was no way I thought this was going to work. However it ended up looking perfect! She cut it on me to make it look like a torn, worn fairy dress. We hot glued ribbon on it to add an element of sparkle as well- super easy and only took like 20 minutes. We ordered my wings online. They were huge but lacked anything special so we added to them. (More on that in the next section!)
  5. Little details. Since were from Minnesota Halloween is usually pretty chilly. IMG_1803
    Ruby’s mom found colorful, fun boots on amazon.com and ordered them for us. Ruby wore brown boots and leggings she already had. We hot glued sparkle puff balls on the tops of our boots to look like the fairy shoes from the movies. We used those same sparkly puff balls to embellish other things too. We added them to our wings to make them stand out more. I put them all over mine and it took them from plain and simple to standout wings. It is amazing what a few sparkle puff balls, jewels, and hot glue can do. Since it was Halloween we ordered pixie sticks so we could give that out to trick or treaters as our “fairy dust.” It was a hit! If you are doing this theme for a birthday party, send some pixie sticks home in the kids treat bags or have them for a little treat during the party. Easy to find online in bulk.
  6. Hair and makeup. We both did our own makeup and only had to buy a few things. Ruby’s mom found a Tinkerbell tutorial to follow online and replicated that. I just bought some silver eyeliner and shadow and made something up! Once again super IMG_1837easy to do and you don’t need to buy any expensive makeup, the cheap stuff works just as well. Ruby’s mom did her hair up in a bun like Tinkerbell, and since Silvermist wears her hair straight and down I didn’t need to do much.
    I added a few hair charms, with a flat iron (Charmsies), to give some fun silver sparkle to my hair. For Ruby’s hair, her mom found a brown braid for only $2 at our local Sally Hansen beauty store and secured that in her hair. Ruby loved it and it stayed in all night! She said it made her feel just like Fawn 🙂
  7. Putting it all together. When the day came to it was all hands on deck. The front step was cleared off of all the leaves and the green carpet was laid. Then we lined that with pumpkins, real and glitter ones 🙂 The sign was hung from the roof and christmas lights were hung around it to add some light as it got darker. Once again using something most people have (christmas lights) can add a lot to the effect of the theme. We all got into our costumes and did our makeup accordingly. Then when it was time for the party to begin and trick or treaters to come we all made our way outside to greet the little ones and welcome them to Pixie Hollow!

Overall it was a major success! Ruby had a great night playing fairies and giving out candy with all of us. We flew around the driveway, handed out our pixie dust, and laughed the night away. Like I said before this could be done for any theme, as long as you are creative and willing to do some DIY work. You don’t need to be super savvy with arts and crafts to make something look convincing. Googling ideas for your theme on Pinterest can provide lots of inspiration and how to’s. If you were using this theme for a birthday party you can take the idea even further. You could have an arts and crafts portion of the part where you make fairy wands and color pictures of different fairy’s. For food you could serve whatever little goodies your kiddo likes and call them “Tinkerbell Treats” or “Fairy Food.” You could have whatever adults that dressed up as fairies read a book about fairies as another activity. Again you can tailor these ideas to any theme with just a little tweaking! All in all you get out what you put in. If you put in a lot of effort, your going to get out lots of squeals and giggles and smiles from the kids who actually feel transported to their favorite imaginary place!

xoxo Kelly

More pictures from the great night!

IMG_1851Tinkerbell and Fawn

IMG_1834Silvermist and Fawn

IMG_1828Captain Hook, Think, Fawn, & a King

Other costume details and a helpful cutie!

IMG_1886  IMG_1890

IMG_1805   IMG_1808